PARTITA STUDIO is a desktop application for AI-assisted orchestral music composition on Windows and macOS. Describe your vision in plain English, and PARTITA STUDIO will plan the arrangement, create parts for each instrument, and prepare a final MIDI file.
We publish news, release notes, and product updates in our Telegram channel @partitapro.
What is PARTITA STUDIO
PARTITA STUDIO combines an LLM-based chat agent with a full-featured MIDI editor. You state your musical intention — "a heroic theme in D-minor for full orchestra" — and the system automatically:
Plans the structure and arrangement
Generates parts for each instrument, taking into account articulations, dynamics, and range
Processes the result through a MIDI pipeline (quantization, harmonization, humanize)
Sends the final MIDI to your DAW via a virtual MIDI port
Vibecomposing — an approach similar to vibecoding: you describe the concept, and the AI agent drives the application through a set of tools, reading the project state, planning steps, and iteratively creating the music.
Key Features
AI Agent
Chat interface with access to dozens of tools — from reading the score to pinpoint edits. The agent plans, generates, verifies, and refines parts autonomously.
MIDI Editor
A full Piano Roll (C0–B8) with lanes for velocity, CC, articulations, and sustain. Undo/redo, copy/paste, transposition.
67 Profiles
Ready-made profiles for CSS, CSB, CSW, Nucleus, Spitfire, Strezov, and General MIDI. The library now includes solo, section, and ensemble setups.
Knowledge Base
71 documents of practical knowledge, from orchestration to pop and electronic arranging. The agent consults them before planning.
DAW Integration
Real-time MIDI routing through LoopMIDI on Windows or the built-in IAC Driver on macOS. Export standard MIDI files.
Your Models, Your Keys
OpenAI (including Codex sign-in), Anthropic, Google Gemini, OpenRouter, Polza.ai, plus local Ollama and LM Studio. Requests go straight from you to the provider, with nothing in between.
Precise Edits
Change one note, a velocity, a CC curve or the tempo of a few bars — without touching the rest and without regenerating anything. Individual bars can be rewritten from a description, leaving the part around them intact.
Live recording
Play a part on a MIDI keyboard: metronome count-in, quantization, every pass kept as its own take, and an overdub mode for building up in layers.
Mixer
Volume, pan, mute and solo for every track in one panel. The sound source is chosen per track: built-in bank or external sampler.
Skills
Extensions that give the agent instructions and knowledge for your genre or library. You can ask the agent in chat to build one for you.
Workflow
A typical workflow in PARTITA STUDIO looks like this:
Create a project — select a template or start from scratch, set tempo, key, and time signature
Add instruments — choose from the profile library or create your own
Describe your idea — the agent plans the arrangement and generates parts
Refine the result — edit notes in the Piano Roll, rewrite individual bars from a description, play a part in yourself on a MIDI keyboard, or ask the agent to revise
Balance it — volume, pan and solo/mute in the mixer
Export — save the MIDI file or send notes directly to your DAW
Getting Started
Installation
PARTITA STUDIO runs on Windows 10+ and macOS 11+. Installation takes just a minute.
System Requirements
Operating System
Windows 10 (64-bit) or newer; macOS 11 or newer
RAM
4 GB minimum, 8+ GB recommended
Disk Space
~300 MB for the application
Internet
Required for cloud AI providers
Installation
Windows
Download the installer Partita-Setup-X.Y.Z.exe from the homepage
Run the installer — it may require admin privileges to install to C:\Program Files\PARTITA STUDIO
You can select a different installation folder if desired
PARTITA STUDIO will launch automatically once finished
On Windows, the installer creates desktop and Start menu shortcuts. .partita files can be opened directly by double-clicking them.
macOS
Download the universal Partita-Setup-X.Y.Z.dmg image from the homepage
Open the image and drag PARTITA STUDIO into the Applications folder
Launch the app from Applications; the build supports both Apple silicon and Intel Macs
The current build is not yet signed or notarized by Apple. If macOS blocks the first launch, try opening it once, then go to System Settings → Privacy & Security, scroll to Security, and click Open Anyway. Only override this warning for the image downloaded from partita.pro.
Updates
PARTITA STUDIO checks for updates automatically on launch and every 4 hours. When a new version is available:
A notification showing download progress will appear
Once downloaded, a "Restart and update" button will be shown
The update will be installed on the next launch or when clicking the button
You can also check for updates manually: Settings → Development → Check for updates.
A note on macOS: the current macOS builds are not signed with an Apple certificate, so the system does not allow in-place updates. The app will announce a new version and offer to download the installer — grab the DMG and reinstall over the old copy; your projects and settings are kept. This is expected behaviour, not an error.
DAW Setup
To send real-time MIDI to your DAW, use the LoopMIDI virtual MIDI port on Windows or the built-in IAC Driver on macOS. Read more in the DAW Connection section.
Getting Started
Quick Start
Create your first composition in 5 minutes.
Step 1. Connect a Model
PARTITA STUDIO runs on your models and your keys. Open Settings (the gear icon in the top right) → the Agent section:
Pick a provider: OpenAI, OpenAI Codex, Anthropic, Gemini, OpenRouter, Polza.ai, Ollama or LM Studio
Paste the API key. You can also go keyless: the OpenAI Codex provider signs in with OAuth through your ChatGPT account, and Anthropic accepts a token from claude setup-token
Click the model field — the list loads by itself — and choose a model
Go to the Generation section and set up the second slot the same way
The Agent slot thinks: it holds the conversation, plans the form, reads the score and decides what to redo. The Generation slot writes notes from a finished directive. A sensible start is a strong model for the Agent and a fast one for Generation — for example, Claude Sonnet 5 or GPT-5.6 as the Agent and Gemini 3 Flash or GPT-5.4 Mini for Generation. More in Models & Providers.
You can stay off the cloud entirely: Ollama and LM Studio run models locally and need no key — just the address of your local server.
Step 2. Create a Project
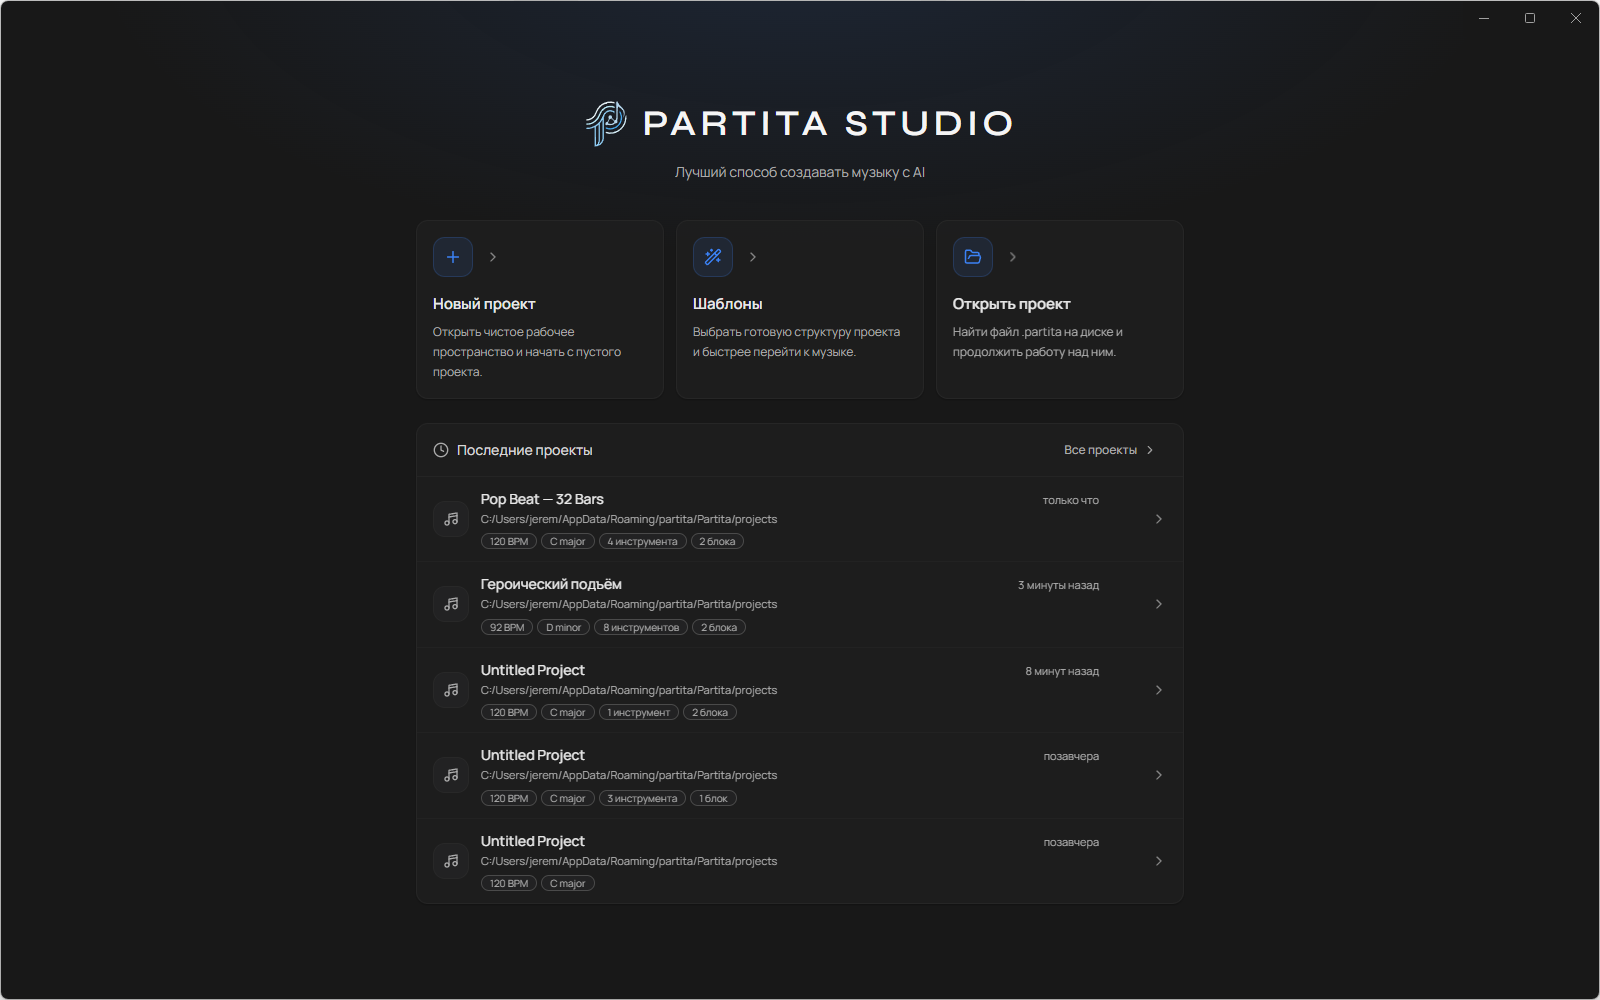
The start screen: new project, templates, and recent projects with BPM, key, and line-up.
Press Ctrl+N or the New Project button in the toolbar. Choose a template:
Orchestral — a full orchestra (strings, brass, percussion)
Chamber — a smaller ensemble
Empty project — add instruments manually
Set the tempo (BPM), key, and time signature in the timeline top bar.
Step 3. Describe Your Idea
Open the chat (Ctrl+L) and tell the agent what you want to hear:
Write a heroic theme in D minor, 16 bars long, 100 BPM, 6/8 time. Start with strings, the brass enters at bar 9.
The agent will then:
Analyze the current project state
Search the knowledge base for orchestration best practices
Plan the arrangement (which instruments play what and when)
Generate the parts for each instrument
Verify the result and make adjustments if necessary
Step 4. Listen and Refine
Press Space to play back. If something is off, say it in plain words — there is no need to redo the project:
"Make the violin melody more expressive" or "Remove the trumpets from the first four bars"
"The cello is off the harmony in bar 12 — fix just that note"
"Slow down towards the ending: from bar 29 ease down to 80 BPM"
Right-click a clip → Send to chat to make the agent work on that fragment specifically
Or open the clip in the Piano Roll and edit the notes by hand
The agent can see what is already written: it reads the whole score of a block, checks the vertical bar by bar, and edits in place instead of rewriting everything.
Step 5. Export
When you're happy with the result:
MIDI file — use the "Export MIDI" button in the toolbar
To DAW in real-time — enable WebMIDI in settings and press Play
Save Project — save as a .partita file to continue working later (Ctrl+S)
Where to Go Next
The five minutes are over — this is where the interesting part starts:
Coherence & Score — how to make the parts sound like one ensemble and bring themes back
Precise Editing — change one note, one CC or the tempo of three bars without regenerating
Tempo & Meter — accelerations, ritardandos and meter changes inside a piece
Clip Editor — Piano Roll, velocity, CC, articulations
Transport Bar — playback, position
Toolbar
The top panel contains:
Project Management — name, new, open, save, export MIDI (for the whole project or specific blocks)
Global Parameters — BPM, key, time signature (can also be changed via InfoBar on the timeline)
Generation (Magic Buttons) — quick generation in the selected block: for the entire arrangement, melody, accompaniment, bass, or a single clip
Undo/Redo — undo and redo actions
Chat — toggle the AI agent panel
Settings — open application settings
Timeline
The central area is the visual representation of your project:
InfoBar (top) — global parameters, block addition, revision history
Blocks — horizontal sections (intro, verse, chorus, etc.). Each block has its own chords and length
Lanes — instrument tracks inside each block
Clips — cells at the intersection of a lane and a block, containing generated notes
Mini previews — each clip can show the overall note shape directly on the timeline
Curve Overlay — overlay of macro curves (intensity, momentum, space) over the blocks
Ruler — displays bar numbers indicating the current position
A context menu (right-click) on blocks and clips provides access to operations: rename, delete, duplicate, send to chat, etc.
Chat Panel
The right panel housing the AI agent (toggled with Ctrl+L):
Multi-sessions — several independent chats
Attach clips — send a specific part to the agent for refinement
Tool calls — shows which tools the agent is using
Thinking — reveals how the agent "thinks" (for reasoning models)
Diff cards — summary of the changes made by the agent
Clip Editor
A floating panel above the arrangement (double-click on a clip or press 4):
Piano Roll — full C0–B8 range, draw, select, delete notes
Velocity Lane — edit the dynamics of each note
CC Lane — MIDI controller curves (CC1 Modulation, CC11 Expression, etc.)
Articulation Lane — articulation switch points
Sustain Pedal — toggle the sustain pedal
Floating panels
The editor, the chat and the mixer are capsules — they sit above the arrangement instead of taking space from it for good:
Height (editor and mixer) is dragged from the top edge, chat width from the left edge
The expand button stretches a panel across the workspace, Esc brings it back
When the chat is open the other capsules narrow automatically — panels never overlap each other
Transport Bar
The bottom playback control strip:
Play / Pause / Stop and record
Current position (time and measure)
Loop — loop the selected section
Metronome — click to toggle, right-click for count-in and level settings
Magnet — snap seeking to the timeline grid
MIX — the mixer with volume, pan, mute and solo
Generation and error indicators
Project
Project Management
Creating, saving, opening, and exporting projects.
Creating a Project
A new project is created via Ctrl+N or the button in the toolbar. The following options are available:
From a template — a pre-filled instrument set and structure for common scenarios
Empty project — a blank canvas where you add instruments and blocks manually
From custom template — your own saved templates
File Format
Projects are saved in the .partita format — a JSON file containing the full project state: instruments, blocks, chords, generated parts, and curves. .partita files are associated with the application and open via double-click.
Saving
Ctrl+S — save the current project
If the project hasn't been saved yet — a file picker dialog opens
An unsaved changes indicator appears in the title bar
Opening
Ctrl+O — open a .partita file
Double-click a .partita file in Explorer
Recent projects list in the new project dialog
Revisions
PARTITA STUDIO automatically saves project revisions. You can revert to any previous version using the revision history button on the timeline InfoBar. Revisions are stored in the application's data directory and linked to the project ID.
Project Templates
You can save your current project as a template for future use. The template saves instrument settings and block structure (without generated notes).
Project
Blocks & Structure
Blocks are the structural units of your composition. Each block represents a song section (intro, verse, chorus, etc.).
What is a Block
A block is a section of your composition with a specific length (in bars), type, chord progression, and a set of clips for each instrument.
Block Types
The block type affects its visual display and acts as a hint for the AI:
intro — introduction
verse — song verse
chorus — song chorus
bridge — connecting section
outro — ending
development — section evolving materials
transition — transition between parts
climax — peak of the piece
custom — user-defined type
Block Operations
Adding — "+" button on the InfoBar or via context menu
Moving — drag-and-drop on the timeline
Duplicating — copies the block along with all its clips
Changing length — duration in bars is set in the block's properties
Inheriting — a block can inherit a theme from another block (for thematic coherence)
Phrase Patterns
Every block can have a phrase pattern — an outline of how musical phrases are distributed across bars. This pattern guides how the AI builds melodic lines:
AABB — two groups of 2-bar phrases
ABAB — alternating phrases
ABAC — phrases with contrast at the end
Custom patterns
Swing and Groove
A block can carry a swing setting — the delay applied to offbeats that produces the characteristic lilt of jazz, shuffle, and many pop grooves. You choose the depth (from a straight 50% up to an extreme 75%) and the grid it applies to: eighths or sixteenths.
Swing is stored with the block and reapplied on every generation, so regenerating a part never loses the feel. You can also just ask — "give it a light sixteenth-note swing" — and the agent sets it for you.
The model still writes notes on a straight grid; the feel is applied afterwards during processing. That keeps swing predictable and identical across every part in the block.
Project
Instruments & Profiles
Instrument profiles contain all the information the AI needs for proper generation: range, articulations, and MIDI mapping.
Adding Instruments
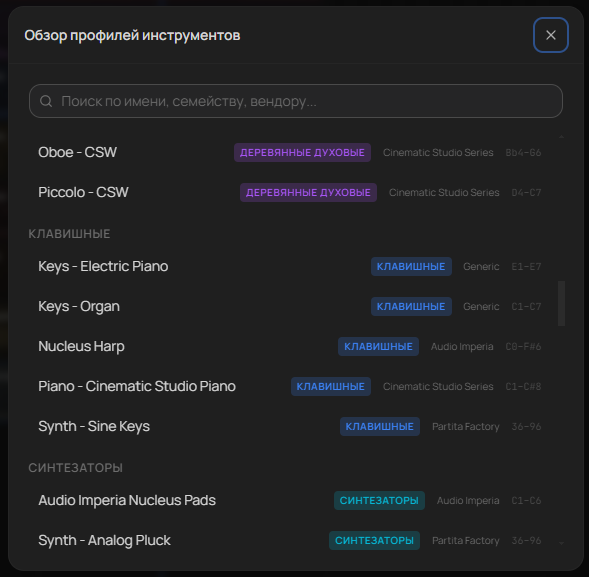
Click the add instrument button on the timeline. A profile browser partitioned by instrument family will open:
Percussion — orchestral and epic percussion (Strezov, GM)
Keys — piano, harp
The profile browser: search by name, family, and vendor; every profile lists its range.
Instrument Profile
Each profile includes:
Parameter
Description
Range
The valid note range (absoluteRangeLow/High). Notes outside this range are automatically corrected
Articulations
A list of available playing techniques (legato, staccato, marcato, etc.) with their MIDI mapping
Articulation Mode
keyswitch (triggered by specific notes) or cc (MIDI CC sequences)
Polyphony
Maximum number of simultaneous notes
Family
strings, brass, woodwinds, percussion, keys
Default Role
melody, pad, bass, motif, arpeggio, etc.
Custom Profiles
You can create and edit instrument profiles:
Via AI — ask the agent in the chat: "Create a profile for Spitfire Chamber Strings"
Manually — the profile editor (right-click → "Edit Profile") lets you set all parameters yourself
Custom profiles are saved in the application's data directory
Instrument settings
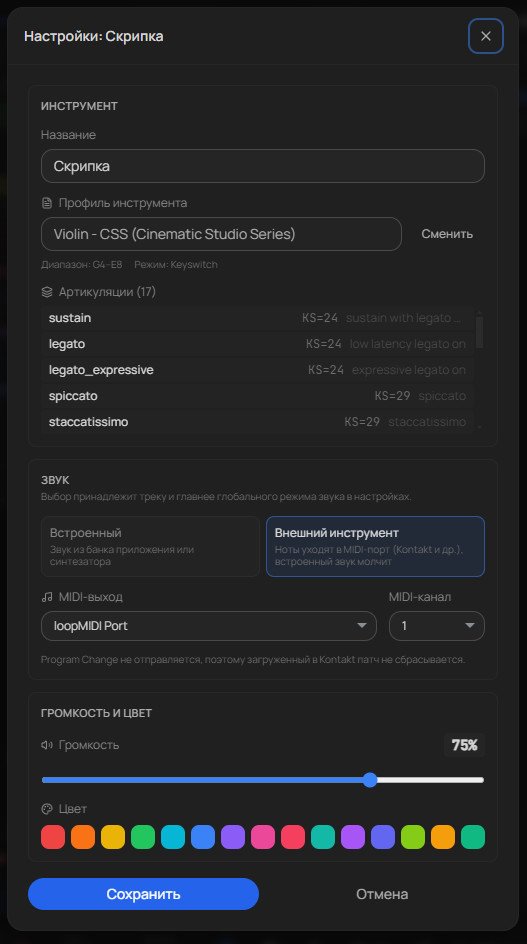
Right-click a track → Settings. The dialog is split into three parts, each holding only what belongs to it:
Instrument — the profile, its range and articulations
Sound — the source (built-in or external instrument) and everything that depends on it
Level and colour — track volume and its colour on the timeline
Track settings: profile and articulations, sound source with its MIDI port, volume and colour.
Sound source
The source is chosen per track and always wins over the global playback mode:
External instrument — the part goes out to a MIDI port (LoopMIDI, IAC Driver) and plays in Kontakt, PLAY, Sine or another sampler. Port and MIDI channel are set here
Built-in — the SoundFont bank or the profile's own synthesizer. Timbre and channel are set here
So some parts can go to a sampler while the rest play back internally. When a track's choice disagrees with the global mode, the dialog says so — that way "the bass went silent" reads as "this track is deliberately different from the project". Tracks whose source was never set follow the global mode.
The GM program only appears where it changes something: external instruments never receive Program Change (it would reset Kontakt patches), and a profile with its own synthesizer sets the timbre itself.
MIDI Routing
Channel — MIDI channel (1–16)
Port — MIDI output for tracks with an external source
Auto-assign — PARTITA STUDIO can distribute channels automatically
Record mode
Each track has its own live-recording mode — replace or overdub. Right-click the ● button to switch it; see MIDI Keyboard Recording for details.
Project
Chords & Harmony
The chord progression lays down the harmonic foundation of each block. The AI relies on it when generating parts.
Chord Editor
Chords are defined per-block. Open the chord editor via a block's context menu on the timeline. Each chord is anchored to a specific bar.
Chord Formats
Standard musical notations are supported:
Basic triads: C, Dm, E7, Fmaj7
With modifiers: Gsus4, A♭dim, B♭aug
Inversions (slash chords): C/E, Am/G
Progression Presets
PARTITA STUDIO includes a library of ready-to-use progressions categorized by mood:
Classical (I-V-vi-IV, ii-V-I, etc.)
Cinematic
Dramatic
Modal
The agent can also suggest a progression if you describe the feel you're going for.
Impact on Generation
During generation, the AI sees the chord map for the block, noting the exact pitches for every chord — e.g., Bar 1: Dm (D, F, A). This assists the model in crafting melodic lines that fit the harmony seamlessly and placing chord tones accurately on downbeats.
Project
Macro Curves
Macro curves establish the broad character of each block — intensity, momentum, and space.
The Three Curves
Curve
Description
Intensity
The overall energy level — from quiet background to roaring climax. Influences the dynamics and richness of generated parts.
Momentum
Rhythmic activity — from slow and measured to driving and fast. Affects note density and rhythmic patterns.
Space
Spatial density — from sparse instrumentation to a massive wall of sound. Adjusts how many instruments play simultaneously.
Editing
The curves are displayed as an overlay on top of the timeline (toggled by the curve visibility button in the toolbar). Each curve consists of breakpoints with values between 0 and 1. The AI agent can automatically draw macro curves when planning the arrangement.
Project
Tempo & Meter
The tempo does not have to stay the same from start to finish: it can change on one bar, across three bars, or drift gradually to a new value.
Base Tempo
A project has one overall tempo (BPM), set in the top panel, and it applies wherever nothing else is specified. If that is all you need, you can stop reading here: an empty tempo map means the old behaviour.
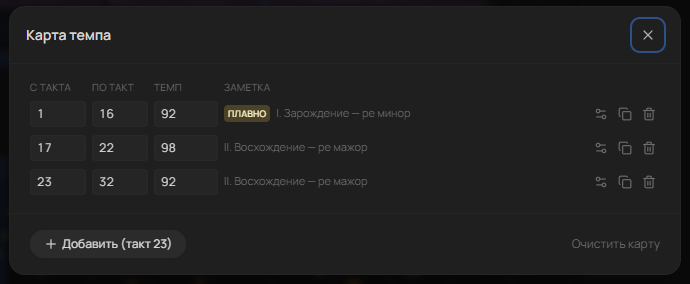
The Tempo Map
On top of the base tempo sits a map: a list of spans in the form "from this bar through that bar — this tempo". Bars are counted from the start of the piece, not from the start of a block, so a request like "80 BPM from bar 29 through 32" means exactly that.
What you ask for
What happens
"Put 92 BPM on bar 17"
One bar runs at the new tempo, then the previous one returns
"From bar 29 to the end — 76 BPM"
A step change on the bar line
"Slow down gradually from bar 25 to 32, down to 70 BPM"
A ramp: the tempo moves evenly toward the new value
"Remove all tempo changes"
The map is cleared and the base BPM remains
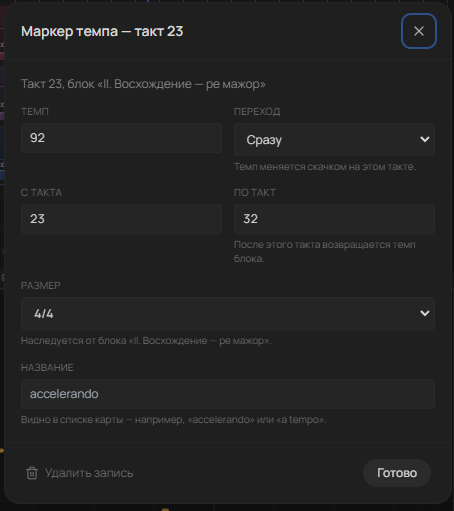
The tempo map: from-bar/through-bar spans; smooth ramps are labelled separately.A tempo marker: step or ramp transition, its bar range, and a label such as “accelerando”.
Changing the tempo does not move any notes: their positions are stored in beats, not seconds. Only the real duration changes — which is why speeding up or slowing down breaks nothing in the parts you already have.
Playback and Export Agree
The player and the MIDI export are built from the same tempo map. Smooth ramps are written out as frequent steps, so the ritardando you hear in your DAW is the one you heard in the app.
Meter
The meter is set per block, and where needed per bar — a single 2/4 bar in the middle of 4/4, for instance, to keep a phrase from sprawling. Compound meters (6/8, 9/8, 12/8) are respected both when strong beats are analysed and when the vertical is checked.
AI Composer
Chat Agent
The AI agent is the core of PARTITA STUDIO. It pilots the app through dozens of tools, grouped by capability, to transform your descriptions into fully fledged music.
How the Agent Works
The agent operates via an interaction loop with the language model:
You send a message (a prompt, a request, a question)
The agent builds a payload with a system prompt detailing its role and the tools available
The model replies with text and/or tool calls
The agent executes the tools locally, gets the results, and hands them back to the model
The loop keeps running until the model outputs its final answer without calling any new tools
The agent streams text back to the UI in real time, so you can read along as it generates.
Operating Modes
Mode
Description
Agent
Full autonomous mode. The agent plans out, generates, verifies, and polishes parts on its own.
Chat
Read-only mode. It can answer questions and examine the project, but cannot make modifications.
Multi-sessions
You can manage multiple independent chats within a single project. Each session keeps its own history and context. Switch between them using the tabs in the chat header.
Attaching Clips
For pinpoint adjustments, send a particular clip into the chat:
Right-click on a clip in the timeline → "Send to chat"
The clip appears as an attachment card above your text input
Tell the agent what to fix — taking the exact notes in that clip into account
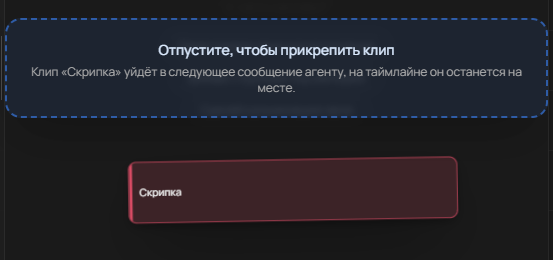
You can also simply drag a clip into the chat — it stays in place on the timeline.
Task Queue
You can queue up multiple requests while the agent is busy. The queued requests will be executed one after another.
Reasoning Effort
For models with configurable reasoning, a level selector is available: off, low, medium, high, and for some models also xhigh. That covers the Claude 4 and Claude 5 families (Fable, Opus, Sonnet, Haiku 4.5), OpenAI's GPT-5.x line and o-series (including via OpenAI Codex), and Gemini 2.5 and 3.x. Claude 5 models additionally support an adaptive mode, where the model decides how much to think on each step. A higher reasoning tier enhances planning quality at the cost of longer response times.
Context and Compaction
The agent monitors the size of your conversation. When the context length edges near the model's limit, the app invokes automatic context compaction — summarizing older messages while preserving essential semantic cues.
AI Composer
Part Generation
How PARTITA STUDIO creates musical parts for each instrument.
Generation Pipeline
Each instrument part goes through a multi-stage pipeline:
Prompting — forming a query to the LLM with rules specific to the instrument type (melodic or percussive)
Generation — the LLM returns JSON containing notes, articulations, and curves
Parsing — the JSON is parsed into a GeneratedPart structure
Processing — the MIDI pipeline applies a series of transformations
MIDI Pipeline
After being parsed, each part passes through a sequence of transformations:
Step
Description
Quantization
Aligning note positions to the grid (down to a 32nd note resolution)
Drum Normalization
For percussion: remapping generated notes to the profile's specific articulations
Range Control
Notes outside the instrument's range are transposed by octaves or clipped
Harmonization
Checking note pitches against the block's chord map
Articulations
Materializing keyswitch notes or CC sequences
Curves
Applying expression (CC11), dynamics (CC1), and micro-dynamics
Breathing
For wind instruments — automatically breaking long notes to simulate breath marks
Humanize
Slight velocity randomization for a more natural feel
Selective Context
When generating an instrument, you can dictate which other parts the model receives as context:
All — the model sees all existing parts in the block (default)
Selective — only specified instruments (for instance, a pad only sees the melody)
No Context — the part is generated completely standalone
Cross-block — feeding parts from other blocks to ensure thematic unity
Notes appear while generating
While the model writes a part, notes show up in the clip — the first ones usually within a couple of seconds, then the part fills in as you watch. This is a preview: it writes nothing into the clip, it exists so you can tell early whether the model went the right way and stop a bad take without waiting for the end.
The finished result is always applied whole, from the complete answer: quantization, range, overlap resolution and dynamics are computed across the entire part at once. That is why an interrupted generation is an error rather than "half a written clip".
The clip the composer is working on carries an indicator: a frame in the instrument colour and a soft animation over exactly the bars being rewritten.
Takes
You can generate multiple variations (takes) for a single clip. Quickly switch between them to pick the best result. Takes are accessible via the clip's context menu.
AI Composer
Section Replace
The part is almost right, but two bars in the middle don't work? Rewrite those, and leave everything else alone.
How it works
Hold Alt and drag across a track — bars inside a single block get selected
A capsule with a prompt field appears next to the selection. Describe what those bars should do
Press Generate — only the selected bars are rewritten
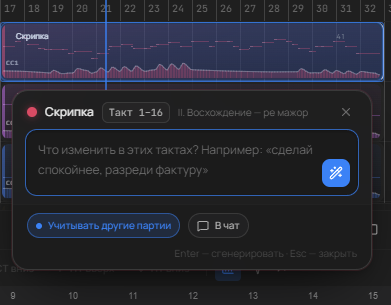
The section replace capsule: describe the change, toggle context, or send it to the chat.
Material outside the range survives by construction: the model's result is spliced into the original at the seam, and notes crossing the boundary are cut exactly on it. Even if the model drifts beyond the brief, it cannot leak past the selection.
Other ways in
Shift+Alt+W — open the capsule for the selected clip as a whole
Clip context menu → Improve or redo — the same thing by mouse
The capsule's "To chat" button — when the edit is easier to discuss with the agent than to state in one line
When the range covers a whole clip, the part is written as a normal generation — a "don't touch bars outside the range" instruction is meaningless for the entire clip.
Empty bars
You can select empty space too: if no clip exists there, one is created exactly on the selection and written from scratch. "Put a four-bar fill here" is a normal request, not an error.
Context
The toggle in the capsule decides whether the composer sees the neighbouring parts of the block. With context the fragment sits better in the arrangement; without it, it follows your description more literally.
AI Composer
Arrangement Planning
Before generating the actual notes, the agent drafts an arrangement plan — a strategic roadmap outlining the role of every instrument.
What is an Arrangement Plan
An arrangement plan (ArrangementPlan) is a structural object formed by a single LLM call for each block. It consists of:
Vision — a high-level summary of how the block should sound
Directives — bespoke instructions for each instrument, defining bounds like role, articulations, entry measure, dynamics, and what context they need to hear
Instrument Directive
Every planned instrument receives:
Role — its function in the ensemble (melody, harmony, bass, rhythm, countermelody)
Description — a descriptive briefing of the part
Entry bar — the measure when it starts playing
Articulations — which playing techniques to employ
Dynamics — the specified dynamic range
Context instruments — which other parts to "listen to" during generation
AI Composer
Knowledge Base
A built-in knowledge base helps the AI make educated musical choices, in the orchestra and in modern arranging alike.
What's Inside
71 documents filled with highly practical knowledge:
Category
Count
Example Topics
Techniques
23
Motivic development, counterpoint, harmony, narrative arcs, pop song form, EDM build & drop, hip-hop beats
Beyond orchestral topics, the base covers modern arranging: pop song form, EDM builds and drops, hip-hop beat construction, kick and bass interplay, drum kit programming with ghost notes, synth roles, and modern keyboard voicings.
How the Agent Uses Knowledge
During the planning phase, the agent queries the knowledge base via the query_music_knowledge tool. The search supports filtering by category, sample library, instrument family, and genre. The retrieved guidelines guide the agent in selecting appropriate articulations, voicings, and stylistic maneuvers.
AI Composer
Web Search
When the built-in knowledge runs out, the agent can look it up online — no API key, no setup.
When the Agent Searches
The knowledge base answers questions about music, but it does not know what shipped last week or what a particular library's page says. Search closes exactly that gap: current information, fact checking, and reading documentation at a link you provide.
The agent decides on its own and only reaches out when it makes sense. You can also ask directly — "search the web", "check the developer's site" — or simply paste a link.
What Actually Leaves Your Machine
Search runs through the Parallel.ai service. Only the search query the agent composed, or the address of the public page to read, is sent. Your project, notes, messages, and model API keys are never transmitted.
Local network addresses are rejected before anything is sent — localhost, private IP addresses, and links carrying a username and password cannot be fetched.
Turning It Off
Settings → Agent → Web search. With the switch off, the search tools are not offered to the model at all, so no query can leave by accident.
The agent treats page content as data, never as instructions: directives found on a web page are not carried out. This protects you from crafted pages that try to drive the agent on your behalf.
AI Composer
Agent Memory
The agent can memorize your preferences and utilize them across future sessions.
How Memory Works
Memory is a collection of records that the agent persists between sessions. Typical examples include:
"The user prefers CSS legato for violin melodies"
"Use Strezov X3M percussion for trailer music projects"
"Avoid overly dense arrangements in quiet sections"
Managing Memory
The agent stores, searches and deletes records itself — you can simply say "remember that I work in 6/8 and dislike heavy brass" or "forget my percussion preferences". Memory lives in the application data directory and is available in every project.
AI Composer
Coherence & Score
Individually pretty parts are not yet music. This section is about how the agent watches the vertical (what sounds at the same time) and the horizontal (how themes live from beginning to end).
The Score of a Block
Before changing anything, the agent reads a map of the block: one row per part, one column per bar. Each cell shows the register and the number of attacks, a sustain mark across the bar line, or silence. Separate rows carry the harmony (with borrowed chords marked) and the energy.
That view immediately shows what a single clip hides: a part that is silent for half the block, three instruments entering at exactly the same moment, an energy dip where the climax was supposed to be.
Checking the Vertical
When a specific spot needs attention — "what is going on in bar 19" — the agent takes a vertical slice: the chord of the bar, the notes of every instrument, how well they fit the harmony, and non-chord tones highlighted on strong beats. That is cheaper and sharper than reading every part in full.
Ensemble Rules
The classic part-writing problems are checked separately:
Parallel fifths and octaves between the outer voices — two voices moving the same way at the same interval, sounding glued together
Voice crossing — the sustained kind, not a passing one: a part that stays above or below its neighbour against the usual order
Register conflicts — parts sitting in the same band, so nothing is distinguishable
The Compositional Intent
The agent keeps a separate record of what is actually being composed: the form and the energy arc, the central motif and its transformations, the register lanes of the instruments, the agreements about transitions between blocks.
That record survives edits, rollbacks and context compaction. The practical consequence is simple: the theme stated in the introduction comes back in the finale instead of dissolving halfway through.
Useful phrasings: "show me the score of this block", "what happens in bars 19–21", "check for parallel fifths", "bring the opening theme back in the finale, but on the woodwinds".
What the Composer Sees
When a part is generated, the model is shown only what it needs rather than the whole project: the melody for a counter-line, nothing at all for an ostinato, a part from another block as a reference for a call-and-response. Less irrelevant context means fewer chances the model starts "reacting" to unrelated voices instead of doing the job.
AI Composer
Skills
A skill is a bundle of instructions and knowledge that extends the agent for a particular job: a genre, a sample library, or your personal style.
What a Skill Does
Adds instructions to the agent's prompt — orchestration rules for trailer music, for example
Brings its own knowledge documents, which join the shared search
May expose settings you can change in the interface
Managing Skills
Settings → Skills. Bundled skills ship with the app; user skills are installed from a folder or from a link to a manifest.json. Each skill is switched on and off separately, and its card shows the author, version, tags and contents.
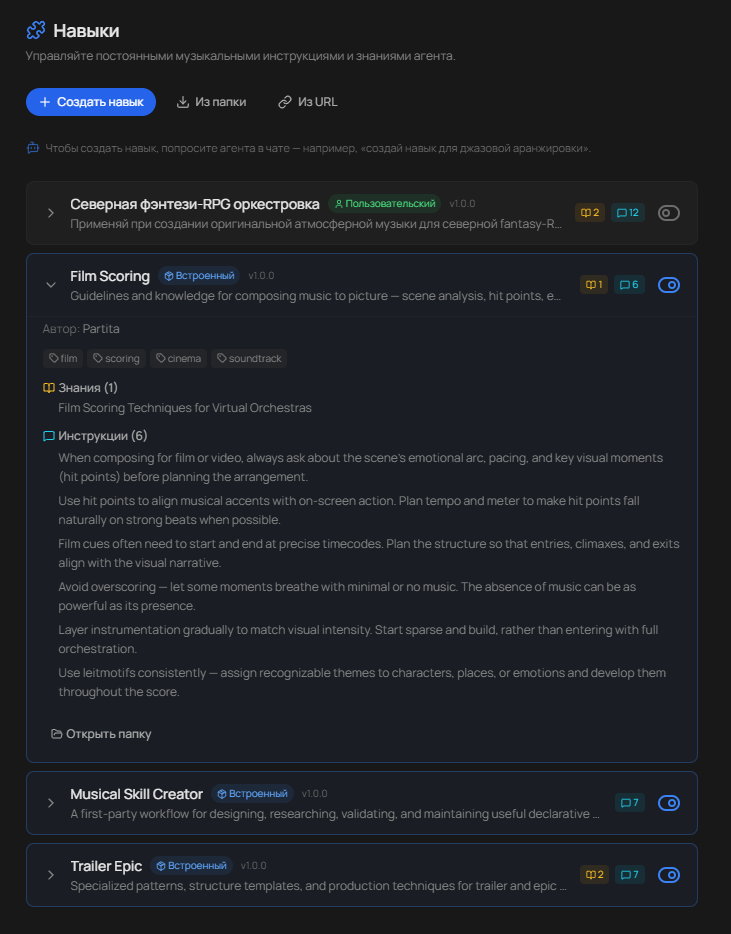
The skills panel: the Film Scoring card is expanded, showing its knowledge and six instructions.
Your Own Skill
The easiest route is to ask the agent: "build a skill for jazz arranging". It will lay out the structure, and you fill in the instructions and knowledge. A finished skill is an ordinary folder — you can hand it to a colleague.
Skills add instructions and knowledge, but they do not execute arbitrary code: installing someone else's skill is safer than running a third-party program.
MIDI
Piano Roll
A fully featured MIDI editor for fine-tuning your generated parts.
Overview
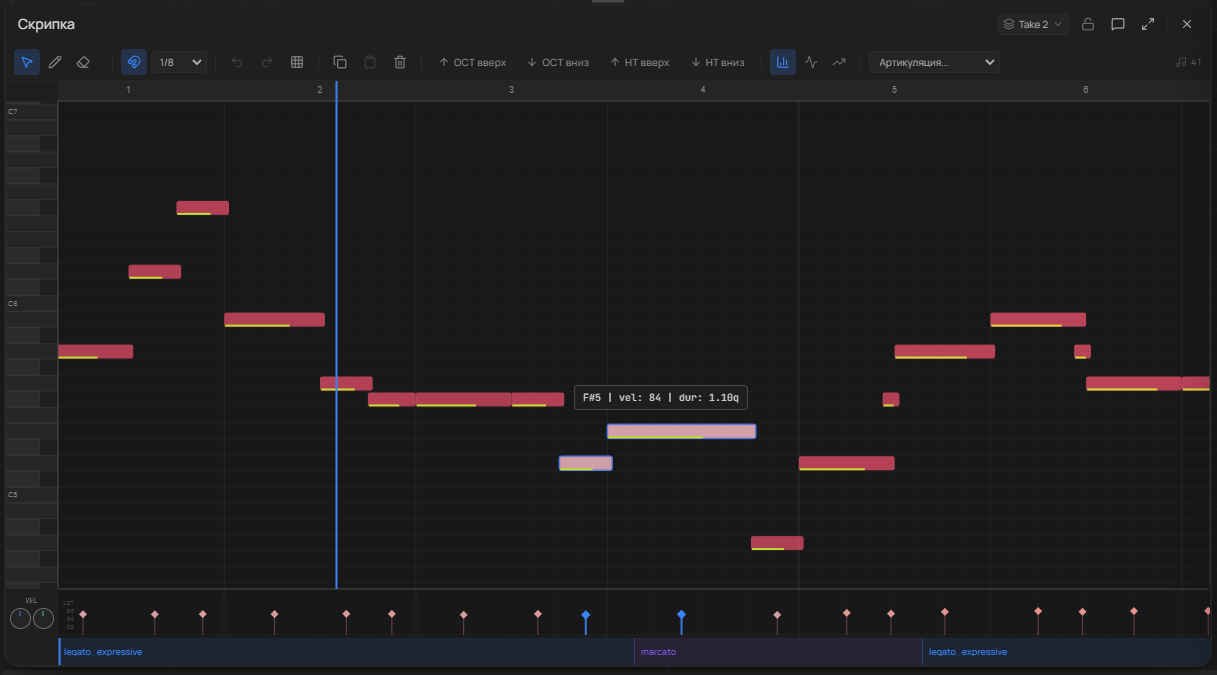
PARTITA STUDIO's Piano Roll is a high-performance canvas-based editor spanning the complete C0 to B8 range (108 keys). Open it by double-clicking on any clip or pressing the 4 key.
The tooltip shows pitch, velocity and duration; below are the velocity lane and the articulation lane.
Tools
Tool
Description
Select
Select and move notes. Marquee selection available. Shift+click for multi-selection
Draw
Draw new notes. Snaps to grid (when snap is enabled)
Erase
Delete notes with a click
Navigation
Mouse wheel — horizontal scroll
Shift + wheel — vertical scroll
Alt + wheel — vertical zoom
Ctrl + wheel — horizontal zoom
When you open a clip, the editor automatically scrolls to frame the existing notes
Lanes
Positioned below the main note grid are supplementary lanes:
Articulations — points marking articulation switches, carrying text labels
Sustain Pedal — toggle events for the sustain pedal
Snap-to-Grid
Snap to grid is enabled by default. The finest step is a 32nd note. Snapping applies to drawing, moving, and stretching notes.
MIDI
Precise Editing
One note, one curve, three bars — without regenerating the part and without the risk that everything else changes along the way.
Why It Matters
The usual trouble with generative tools: to fix a detail you have to run generation again — and the detail changes together with everything you liked. Here an edit is addressed: the agent changes exactly what you asked for, and the rest stays byte for byte the same.
Addressing by Bar and Beat
A note can be named musically: "bar three, beat two, the D". That kind of address survives notes being inserted or deleted around it, and tolerates humanisation — a note nudged slightly off the grid is still found.
Request
What changes
"In bar 12, raise the note on beat two by a third"
That note only
"Make the velocity in bars 5–8 a smooth crescendo"
Only the dynamics of that range
"Smooth CC11 on the violins from bar 9 to 16"
Only that curve, only there
"Drop the last note of the phrase"
One note; nothing else is touched
Grids Down to 1/64 and Triplets
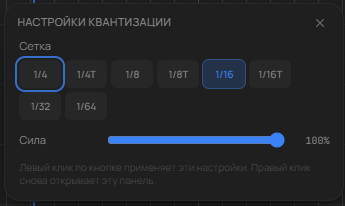
The step of an edit is set by the grid — from a quarter down to 1/64, triplets included (1/8T, for example). The grid also decides how dense CC points should be: a gentle curve does not need an event on every tick.
What Comes Back
After every edit the agent reports what actually changed: which bars were touched and the values before and after. There is no need to re-read the whole clip to confirm the result — and it is what protects you from silent edits that missed their target.
Your Piano Roll edits and the agent's edits share one history: Ctrl+Z undoes both. To step further back in one move, use the project revisions described in Project Management.
MIDI
MIDI Keyboard Recording
Parts don't have to be generated — you can play them. Partita records live performance straight into the clip, with a count-in, a metronome and quantization.
Recording a pass
Connect a MIDI keyboard. The device is picked in Settings → Audio & MIDI; by default every input is listened to
Press ● on the track you want — it arms. From that moment you hear your playing through that instrument, before recording anything
Put the playhead where you want to start and press record in the transport (or Alt+R)
A metronome count-in plays (1 or 2 bars, configurable), then recording starts
Stopping the transport commits the pass into the clip. If no clip exists under the playhead, one is created
Takes
Every pass is stored as its own take of the clip — the previous version is never lost and you can switch between them. Record as many passes as you like and keep the best one.
Overdub and replace
Right-click the ● button to choose the record mode for that track:
Replace (default) — the previous content moves into a take and the pass is recorded from scratch. During recording the old material is muted so you only hear yourself
Overdub — the pass is added to what is already there, without a new take. The clip keeps sounding: playing on top only works if you hear the foundation. Handy when a part is built in layers — chords first, then bass, then ornaments
Controllers are not blended: if you moved modulation or expression during the pass, older events for that same controller inside the recorded span are replaced. Two automation lines on one CC would not sound like "both" — they would sound like jitter.
Quantization
Settings → Audio & MIDI lets you pick the record quantization grid: off, 1/4, 1/8, 1/16 or 1/32. Quantization snaps note starts to the grid but keeps the release point, so durations stay alive. Anything already recorded can be tightened separately with Q.
Metronome
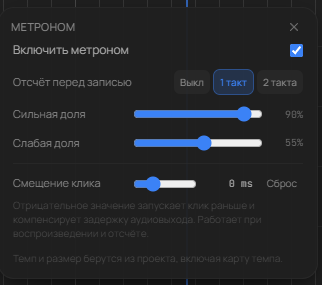
The metronome button in the transport: click to toggle (C), right-click for its settings panel — count-in length (0, 1 or 2 bars), downbeat level and off-beat level.
The click follows the project meter: 5/4 and 7/8 click on the notated beat, compound meters (6/8, 9/8, 12/8) click on dotted quarters, so 6/8 gives two clicks per bar. The tempo map is respected, so the metronome slows down together with the music.
Metronome settings: count-in, beat levels, and a click offset to compensate for latency.Editor quantization: a grid down to 1/64 and triplets, with strength as a percentage.
The right end of the info bar carries a latency indicator that reports MIDI input age and audio output latency separately. If your playing feels late, start there — it shows where the time is actually lost.
MIDI
Playback
PARTITA STUDIO offers two playback engines: a built-in SoundFont player and external MIDI routing to your DAW.
Built-in SoundFont
Out of the box, PARTITA STUDIO uses a built-in General MIDI synthesizer built on a SoundFont engine. This gives you instant playback without requiring additional setups. While the sound quality is rudimentary, it caters well to evaluating melodic and rhythmic concepts.
WebMIDI
For professional-grade sonics, route PARTITA STUDIO to external virtual instruments (like Kontakt, PLAY, Sine, etc.) using WebMIDI. Check out the DAW Connection section for more details.
Per-track sound source
The playback engine is not a single global switch. Every track picks its own source in the instrument settings: built-in (the SoundFont bank or the profile's own synthesizer) or external instrument (a MIDI port). An explicit per-track choice always wins over the global mode, so some parts can go to Kontakt while the rest play back internally. Tracks whose source was never set follow the global mode.
Controls
Space — Play / Pause
Click on the ruler or an empty part of the timeline — set playback head position
Loop — continually cycle through the selected region
Magnet in the transport — snaps seeking to the timeline grid. On by default: a click on the ruler lands exactly on a beat instead of "roughly there"
The playhead is indicated on both the timeline and the Piano Roll. If stopped, the position stays exactly where it paused; pressing Play resumes from there. To return to the very beginning, hit Stop.
Latency
The right end of the info bar shows a latency indicator: MIDI input and audio output separately, colour-coded green, yellow, red. The metronome panel has a slider to compensate for it. The click is scheduled on the same audio clock as the music, so the metronome adds no latency of its own — what remains is the shared output latency, identical for the click, the parts and live playing.
MIDI
Mixer, Volume & Pan
The balance between parts lives in one panel: volume, pan, mute and solo for every track.
The mixer
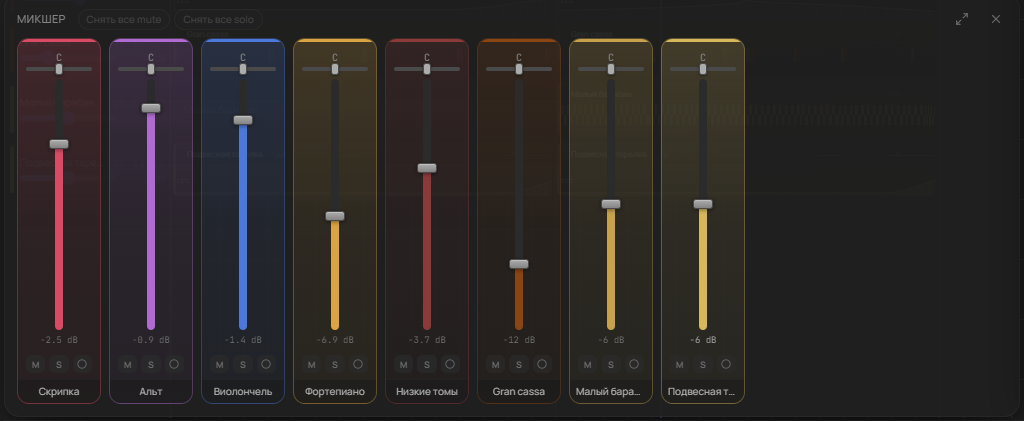
The MIX button in the transport (or F3) opens the mixer — a floating panel over the arrangement. Every track gets a cell tinted with its instrument colour: a vertical volume fader, a pan control filled from the centre, and M / S buttons. Muted and non-soloed tracks dim in the mixer and on the timeline alike, so their state reads from either screen.
The header has "Unmute all" and "Clear all solo". The panel height is draggable from its top edge and is remembered; the expand button stretches it across the workspace and Esc collapses it again.
Each cell is tinted with its track colour; volume is shown in decibels.
Volume
Volume is set in decibels and applied live — you can ride a fader while the project plays. Click the value to type an exact number.
Pan
Pan spreads parts across the stereo field. The built-in synthesizer is panned by a real stereo node; external instruments and the SoundFont bank receive CC10, so the pan travels to your sampler along with the notes and behaves the way your library interprets it.
Volume, pan, mute and solo are ordinary project parameters, so the agent can change them too: "drop the bass 3 dB", "spread the violins to the sides", "mute the drums in the first verse".
MIDI
MIDI Export
Exporting your results to a standard MIDI file for further processing in a DAW.
Format
PARTITA STUDIO exports Standard MIDI Files (SMF) Type 1 at a 480 PPQ (ticks per quarter note) resolution. Each instrument gets its own dedicated MIDI track, incorporating:
The MIDI channel defined in the instrument's routing
Keyswitch notes or CC events used for articulations
You can bring your own material: drop a MIDI file into the chat and the agent can read it.
How to Import
Drag one or more .mid files straight into the chat panel. They are parsed, stored with the project and attached to your next message — the agent sees their tracks, notes and tempo.
What to Do With It
"Take the melody from this file and arrange it for strings"
"This is a sketch from my DAW — build the harmony around it and add a counter-line"
"Use the drum rhythm from the second track as the basis for an ostinato"
An imported file does not replace your project and overwrites nothing on its own — it is material the agent reads and uses when you ask it to.
MIDI
DAW Connection
Streaming real-time MIDI from PARTITA STUDIO to your DAW through a virtual MIDI port on Windows or macOS.
The built-in IAC Driver in Audio MIDI Setup on macOS
A DAW: Cubase, Reaper, FL Studio, Ableton Live, Studio One, etc.
Virtual instruments (Kontakt, PLAY, Sine, etc.)
Configuration
On Windows, install LoopMIDI; on macOS, open Audio MIDI Setup and enable the IAC Driver. Create a port named "PARTITA STUDIO"
In PARTITA STUDIO: go to Settings → Audio & MIDI and select that virtual port as the output
In your DAW: create MIDI tracks and select the same virtual port as their MIDI input
Assign MIDI channels in your DAW to match PARTITA STUDIO's routing
Put simply: create a virtual MIDI port with the tools provided for your system, then select it in both the app and your DAW.
PARTITA STUDIO→Virtual MIDI port→DAW + VSTi
It doesn't have to be all or nothing
You don't have to push the whole project into a sampler: the sound source is chosen per track (Instrument settings → Sound). Strings can play in Kontakt while scratch drums and a pad stay on the built-in bank — and the other way round, a single part can be sent out without moving the rest.
Program Change is never sent to external tracks: libraries like Kontakt don't use it, and an incoming message would reset the loaded patch. Instead CC1 and CC11 are initialised on connect — otherwise an instrument sitting at zero dynamics stays silent even when it receives notes.
Reconnecting
PARTITA STUDIO automatically detects when MIDI ports disconnect and reconnect, for example after restarting a virtual port or waking from sleep. If a port is lost, it attempts automatic reconnection with exponential backoff. The port status indicator (green/red) is visible in the MIDI settings.
Settings
Models & Providers
Configuring AI models for the chat agent and generative engines.
Two Model Slots
PARTITA STUDIO uses two independent slots. Every request goes straight from your machine to the provider you chose, with your key — the app does not proxy it through our servers.
Slot
Purpose
Agent
Conversation, the arrangement plan, reading the score and reviewing the result. Needs a strong model with solid function calling.
Generation
Writing the notes from a finished directive. It works from a strict prompt, so a faster and cheaper model belongs here.
How the Roles Are Assigned
Four roles work inside those two slots, and how they are assigned matters for quality:
Role
What it does
Which slot
Agent
Holds the conversation, calls tools, makes decisions
Agent
Planner
Writes the form and the per-instrument directives
Agent
Critic
Reviews finished parts and decides what to redo
Agent
Composer
Writes the notes, articulations and curves
Generation
The form and the plan come from the Agent slot — this is one of the most audible places where cutting costs costs music. The notes come from the Generation slot, and there a fast model usually does the job.
Economy pairing — a strong model in the Agent slot, a fast one in Generation. A sensible balance for everyday work
Maximum quality — a strong model in both slots. Noticeably more expensive, but you hear it in phrasing and detail
Supported Providers
Provider
Authentication
Notes
OpenAI
API Key
The GPT-5.x line: GPT-5.6 (Sol, Terra, Luna), GPT-5.5, GPT-5.4 and GPT-5.4 Mini, plus the o-series
OpenAI Codex
OAuth
Sign in with your ChatGPT account, no API key needed. The same GPT-5.x models plus the Codex models (e.g. GPT-5.3 Codex Spark)
Anthropic
API Key / OAuth
The Claude 5 family — Fable 5, Opus 5, Sonnet 5 (up to a 1M-token context) — and Claude Haiku 4.5. Signing in with claude setup-token is supported
Google Gemini
API Key
Gemini 3.1 Pro and Gemini 3 Flash; the 2.5 generation works too
OpenRouter
API Key
Aggregator — many models behind one key
Polza.ai
API Key
Aggregator billed in roubles
Ollama
No key
Models running locally on your machine, free
LM Studio
No key
Local models with GPU acceleration, free
The model list is not baked into the app: it is fetched from the provider when you open the model field, so new model versions show up on their own, without updating PARTITA STUDIO.
Which Models to Pick
Guidelines as of August 2026, matched to the two slots:
Task
Example models
Agent — planning, review, conversation
Claude Sonnet 5, Claude Opus 5, GPT-5.6, Gemini 3.1 Pro
Generation — notes from a finished directive
Gemini 3 Flash, GPT-5.4 Mini, Claude Haiku 4.5
Maximum quality in both slots
Claude Fable 5 or Claude Opus 5 — pricier, but you hear it in phrasing and detail
Reasoning Level
A reasoning-level switch appears next to the model — but only for models that support it: Claude 4/5 with extended thinking, OpenAI's GPT-5.x and o-series, Gemini with thinking, and reasoning models via OpenRouter and Polza.ai. The levels are off, low, medium, high, with xhigh on some models; Claude 5 also offers adaptive, where the model decides how much to think. A higher level helps noticeably with planning and review, and barely matters while notes are being written.
Configuring a Slot
Pick a provider from the dropdown menu
If you use an external cloud provider, enter the API key
Specify a Base URL only when it is actually needed (local models, self-hosted setups, or proxies)
Click the model field — a pop-up will fetch the available models
Select your preferred model
For local models through Ollama or LM Studio no API key is needed — just point the Base URL at your local server. API keys are stored only on your computer, in the app's settings file; OAuth sign-in tokens are additionally encrypted with the operating system's protected storage.
Settings
Audio & MIDI
Connecting your audio output and managing MIDI interfaces.
Audio Output
Select the device that will process playback from the built-in SoundFont synthesizer. It defaults to your system's primary output.
MIDI Port
Choose the target MIDI port for broadcasting WebMIDI data. PARTITA STUDIO enumerates all available MIDI outputs on your system. In practice, that usually means LoopMIDI on Windows or IAC Driver on macOS.
Port status indicator:
● Green — port connected and engaged
● Red — port disconnected or encountered an error
The "Test" button sends a brief note (C4, 300ms) to verify the connection.
MIDI Input
Settings for recording live performance:
Device — which MIDI keyboard to take notes from. By default every input is listened to, with an availability indicator next to it. Devices are picked up on the fly, so a keyboard can be plugged in without restarting the app
Monitoring — hear your playing through the armed track
Managing your user profile, trial period, and license credentials.
Trial Period
Every new user gets 30 days with full access to every feature. No card is required to sign up. The trial limits neither the number of projects nor exporting — it is the complete application, just for a while.
Signing In with an Email Code
Your email is confirmed with a six-digit code from a message — the code is right in the subject line, you enter it on the same screen where you signed up, and it logs you straight in. The same works for signing in without a password: request a code from the sign-in screen. It is also the only route if you forget your password — there is no separate reset procedure. A sign-in code is valid for 10 minutes, a confirmation code for 30. The message comes from auth@partita.pro — if it is not in your inbox, check the spam folder and add the address to your safe senders.
A Licence, Not a Subscription
You buy the application itself. The models and the keys are yours, so you pay your AI provider directly rather than paying us for access to someone else's tokens.
Licence
Price
What it means
1 year
2,990 ₽
12 months of work and updates
3 years
7,990 ₽
36 months — about 11% cheaper than renewing the yearly licence three times
Lifetime
19,990 ₽
One payment, no expiry date, all future updates
Instalment plan
449 ₽ / month
36 payments; after the last one the licence becomes lifetime by itself
Payments go through YooKassa. Buying early does not burn the time you already paid for: the new term is added to whatever remains.
How the Instalment Plan Works
One charge per month. Every paid month counts toward the buyout, and the counter is visible in your dashboard
After the 36th payment the licence becomes lifetime automatically and the charges stop
The plan cannot be lost. It cannot be cancelled — only paused, for as long as you need
While paused both the charges and the access stop, and the days you paid for but did not use are saved and returned when you resume
Pausing does not reset the buyout progress
You can detach the saved card in the dashboard: charges stop, the paid period and buyout progress are kept, and the plan continues with a new payment that links a card again
Dashboard
Account management is available in the dashboard on the website and inside the app's settings (Account section): licence state, buyout progress, payment history and totals.
If a Payment Fails
Both the app and the dashboard show a plain-language reason and what to do next: retry later, update the payment method, or resume a paused instalment plan. If a payment is stuck as pending, refresh its status in the dashboard — there is no need to pay again.
Settings
Keyboard Shortcuts
A comprehensive list of keyboard shortcuts for a fluid workflow.
Project and editing
Shortcut
Action
Ctrl+N
New Project
Ctrl+O
Open Project
Ctrl+S
Save Project
Ctrl+Z
Undo
Ctrl+Shift+Z / Ctrl+Y
Redo
Ctrl+C
Copy clip
Ctrl+V
Paste clip at playhead position
Ctrl+D
Duplicate the selection — bars inside a clip, or the clips themselves
Ctrl+Alt+D
Duplicate a track with its content
Alt+S
Split clip at playhead position
Q
Quantize the selection
Delete / Backspace
Delete selection
Escape
Clear selection / close
Playback and generation
Shortcut
Action
Space
Play / Pause
Alt+R
Start or stop recording
C
Toggle metronome
G
Generate all parts for the selected block
Shift+Alt+W
Improve or redo the selected clip
Panels
Shortcut
Action
Ctrl+L
Toggle Chat
F2
Toggle the MIDI editor
F3
Toggle the mixer
1 … 4
Timeline, blocks, curves, Clip Editor
MIDI editor
Shortcut
Action
V
Select Tool
D
Draw Tool
E
Erase Tool
S
Toggle grid snapping
Ctrl+A
Select all notes
Ctrl+D
Duplicate selected notes to the next bar
Ctrl+↑ / Ctrl+↓
Transpose by a semitone
Shift+↑ / Shift+↓
Transpose by an octave
Shift + Wheel
Vertical scroll
Alt + Wheel
Vertical zoom
Ctrl + Wheel
Horizontal zoom
Mouse on the timeline
Alt + drag across a track — select bars and open the regeneration capsule
Ctrl + drag a clip — copy it to another track or another block
Clip edges — drag them to change its length
Every combination can be remapped in Settings → Keyboard Shortcuts. Keys are read by physical position, so your layout and input language do not affect them.
Reference
Templates
Templates kickstart your workflow, supplying pre-configured instrument pools and structures.
Arranger Templates
Built-in templates provide standard orchestral setups and structures for various genres. A typical template incorporates:
A pool of instruments along with their profiles
A block framework mapping out form sections
Advised chord progressions
Recommended instrument routing and roles
Alongside the orchestral setups there are modern ones: Pop Verse-Chorus (verse, pre-chorus, and chorus with a rhythm section and keys), EDM Build & Drop (a rise and drop built on synths and a drum machine), and Trap Beat (808 bass, hats, sparse texture).
Custom Templates
You can package your active project as a template via the toolbar menu. Custom templates save the following:
The instrument lineup and assigned profiles
Block outlines (types, lengths, chords)
Global project variables (BPM, key, time signature)
Note that generated MIDI data is not saved inside templates — solely the architectural foundation.
Reference
Profiles Glossary
A quick overview of the factory profiles provided for popular sample libraries. The app currently ships with 67 ready-made profiles.
Cinematic Studio Strings (CSS)
String profiles for solos, sections, and ready-made ensembles with detailed CC-mapped articulations:
Epic Percussion — taiko, grand gran cassa, aggressive blockbuster percussion
General MIDI
The standard palette configured for the built-in SoundFont engine. Ideal for swift compositional prototyping absent of external libraries.
Modern Instruments
Profiles for pop, electronic, and rock music, written for any synth or sampler rather than one specific library:
Synths — Lead, Pad, and Pluck driven by filter and resonance (CC74/CC71) instead of articulations
Bass — Sub 808 with a long glide, and Electric Fingered
Drum machines — 808 and 909 mapped to the General MIDI layout
Keys — electric piano and organ
Guitar — Electric Clean
These profiles need no articulation switching: expression comes from velocity and continuous controllers, so the agent writes for them differently than for orchestral libraries.
Reference
Agent Tools
What the agent can reach for while it works on your project.
Reading this section is not required: the agent picks its own tools. It is here if you want to make sense of the tool-call cards shown under the agent's replies.
Capabilities Load on Demand
The agent does not keep the entire toolset in front of it. It opens the group it needs — editing, or generation, say — when it gets to that kind of work. This saves context and leaves more room for the music itself.
Reading
Group
What it can find out
Project
Project summary, list of revisions, comparison between revisions, generation log
Block
Block properties, the score, a vertical slice by bars, ensemble violations, chord suggestions, thematic comparison between blocks
Clip
Summary, musical content (phrases, motifs, contour), harmonic fit, list of takes
Instruments
Profiles with their articulations, ranges and routing
Assets
Imported MIDI files and their tracks
Web
Searching the internet and reading public pages — see Web Search
Writing
Group
What it does
Project
Settings, tempo and meter, instruments and profiles, saving, undo, restoring a revision
Structure
Blocks: create, move, duplicate, type and length, chords, macro curves, compositional intent
Editing
Notes, velocity, CC, articulations — addressed by bar and beat, with a report of what changed
Generation
The arrangement plan, generation by role, regenerating a clip with selective context
Transport
Playback, position, loop, MIDI export
Knowledge, Memory and Skills
Searching the knowledge base, working with long-term memory, enabling and configuring skills.
Reference
Troubleshooting
Solutions to frequent stumbling blocks and questions.
Silent WebMIDI Playback
Symptoms: Notes are triggering, but there's no audio output when using a virtual MIDI port with Kontakt or your DAW.
Resolutions:
Ensure LoopMIDI is running and its virtual port is active
Double-check that PARTITA STUDIO's port selection is aimed at the correct virtual MIDI port
Confirm your DAW is actually receiving MIDI from that same virtual port
Corroborate that the MIDI channel on your track aligns with PARTITA STUDIO's assignment
Press the "Test" button within PARTITA STUDIO's MIDI settings to forcibly emit a test signal
Agent is Unresponsive / API Error
Resolutions:
Validate your API key under the model settings menu
Confirm internet connectivity if using cloud services
For offline models: make sure Ollama or LM Studio is running
For OpenAI Codex and Anthropic OAuth: try signing out and back in — the token may have expired
Re-examine your Base URL if bridging via proxy or self-hosted endpoint
Attempt switching to an alternative model or host
Kontakt Ignore Articulation Switches
Cause: Inaccurate keyswitch mapping or mismatched CCs inside the profile.
Resolutions:
Verify the profile perfectly conforms to your sample library's layout
For CSS, articulations run on CC sequences (specifically CC58) — establish that the script is enabled inside Kontakt
For keyswitch-heavy libraries, meticulously verify the trigger notes
Notes Breaching Range Constraints
Resolution: PARTITA STUDIO reflexively prunes or transposes out-of-bounds notation generated by the AI. Should the underlying constraint be incorrect, manually recalibrate the absoluteRangeLow and absoluteRangeHigh properties in the profile editor.
Application Fails to Update
Resolutions:
Trigger an update prompt manually: Settings → Developer → Check for Updates
Check your internet connection
On macOS in-place auto-update is unavailable for unsigned builds — the app offers to download the installer; that is expected, download the DMG and reinstall over the old copy
Download the latest release straight from the website
The Verification or Sign-in Code Never Arrives
Cause: the message was sent but landed in spam or was delayed by your mail provider.
Resolutions:
Codes are sent from auth@partita.pro — search for it in spam and mark it as a safe sender
Check the address you typed: the code goes exactly where it was addressed
Request the code again — there is a one-minute pause between sends
A code works once: requesting a new one invalidates the previous
If nothing arrives after a few minutes, write to support@partita.pro from another address and we will restore access manually